


Why You’ll Love cookies and cream cookies recipe

- Soft & Chewy Texture These cookies bake up with the perfect balance—crisp edges that give way to a tender, almost brownie-like center, thanks to a higher brown sugar ratio and a short chill time that hydrates the flour.
- Loaded with Oreo Chunks You’ll get big, craggy pieces of chocolate sandwich cookie in every bite, not just a dusting of crumbs. We fold in 2 full cups of roughly chopped Oreos for maximum cookies-and-cream flavor.
- No Mixer Required This dough comes together in one bowl with just a whisk and a spatula—no stand mixer, no fuss. It’s a true beginner-friendly bake that delivers bakery-quality results.
- Make-Ahead Friendly The dough can be refrigerated for up to 3 days or frozen for 3 months, making it perfect for last-minute guests or holiday cookie boxes. Check out our brookies cookies recipe for another make-ahead favorite.
- Crowd-Pleasing Favorite From bake sales to birthday parties, these cookies disappear fast. Kids love the familiar cookie pieces, and adults appreciate the sophisticated dark chocolate notes from the crushed wafers.
- Versatile Base Recipe Once you master this dough, you can swap in different cookies, chips, or add-ins. We break down all the variations in our step-by-step approach to cookie customization.
Why You Should Make This cookies and cream cookies recipe
This cookies and cream cookies recipe hits that sweet spot between novelty and nostalgia. According to USDA data, a standard homemade chocolate chip cookie runs about 150 calories, but our version—studded with sandwich cookies—offers a more decadent bite at around 180 calories each, making it a worthwhile indulgence. What sets this recipe apart is the technique: we cream the butter and sugars until pale and fluffy, then gently fold in the chopped Oreos to prevent overmixing, which can turn cookies tough. Bakers like Sally McKenney of Sally’s Baking Addiction swear by chilling the dough for at least 30 minutes to deepen the vanilla notes and prevent spreading. If you’re looking for a dessert that feels special but requires zero fancy equipment, this is it. Pair it with a cold glass of milk, or for a truly over-the-top treat, serve alongside our chocolate lava cake for a double-chocolate finale.
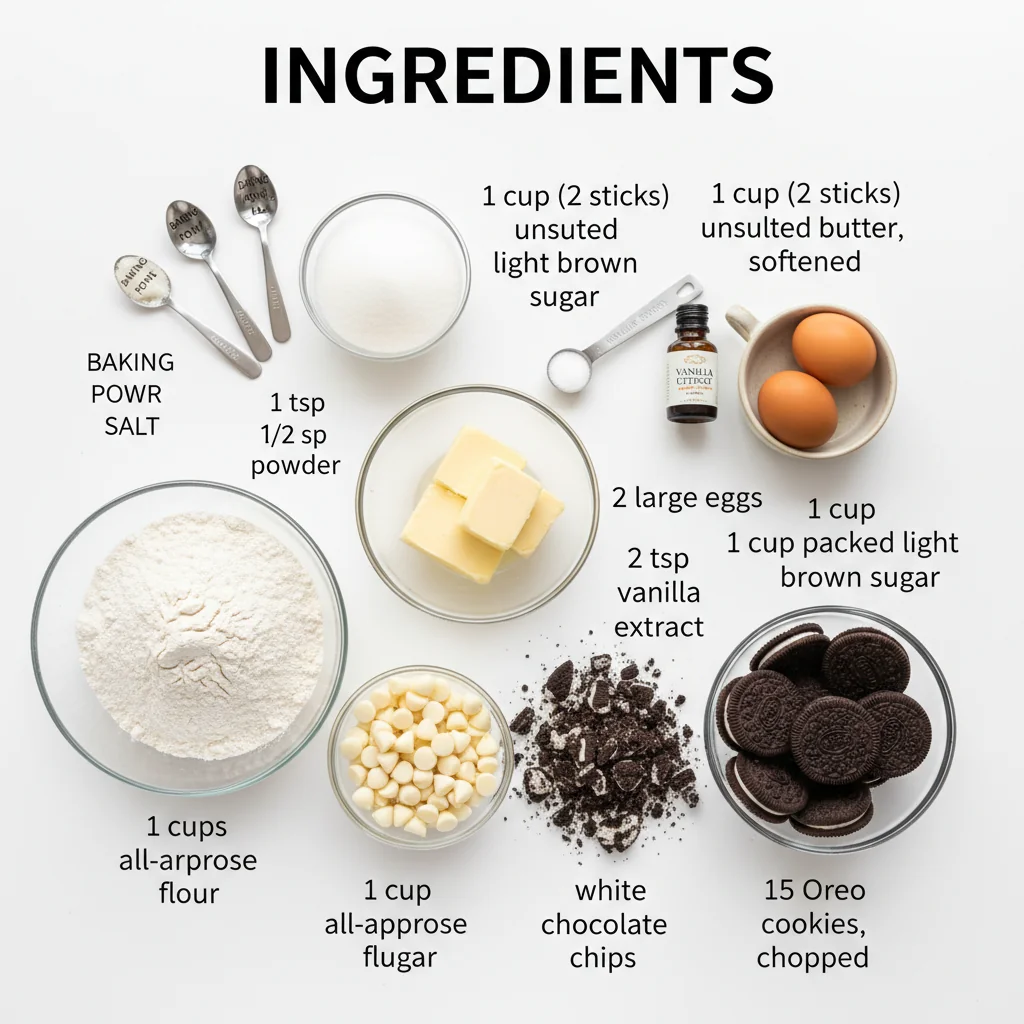
cookies and cream cookies recipe Ingredients
Preparation Times
How to Make cookies and cream cookies recipe
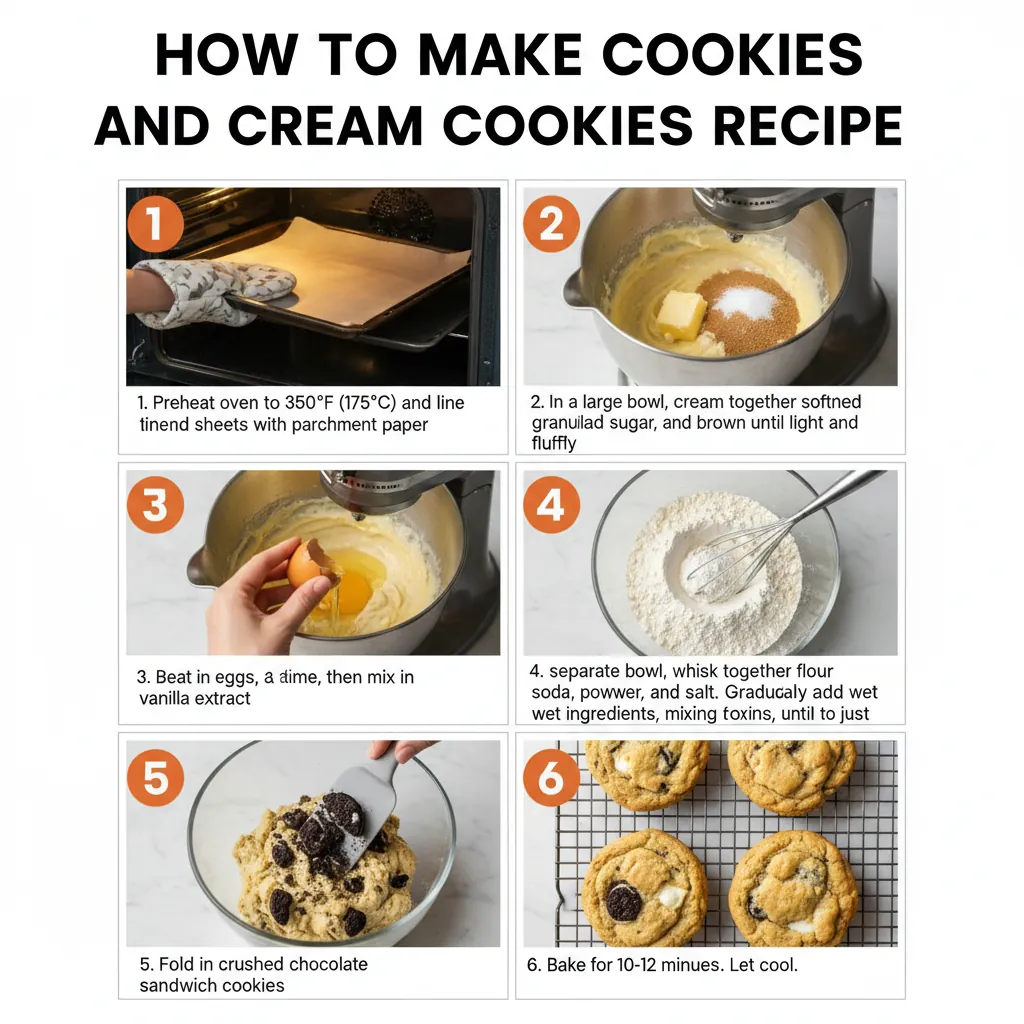
: Cream the Butter and Sugars
In a large mixing bowl, add the softened butter, brown sugar, and granulated sugar. Using a hand whisk or an electric mixer on medium speed, beat for 2-3 minutes until the mixture is light in color and fluffy in texture—you’re incorporating air for a tender cookie. Scrape down the sides of the bowl with a spatula to ensure no streaks of butter remain. The sugars should look fully integrated, not gritty. If you’re skipping the mixer, use a sturdy wooden spoon and some elbow grease; the warmth of your hands will help soften the butter further. Proper creaming is the #1 step for chewy cookies, as noted by Sally’s Baking Addiction.
: Add Eggs and Vanilla
Crack the room-temperature eggs into the bowl one at a time, beating well after each addition. Then pour in the vanilla extract and mix until the batter looks silky and cohesive. The emulsion of fat and liquid at this stage is crucial—if it looks curdled or separated, continue mixing for another 30 seconds until smooth. A curdled appearance often means the eggs were too cold, but don’t panic; it will come together when you add the dry ingredients. Scrape the bowl again to catch any egg pockets hiding at the bottom. This step builds the flavor backbone, so don’t rush it.
: Whisk Dry Ingredients
In a separate medium bowl, whisk together the all-purpose flour, baking soda, and salt until well combined. This isn’t just for even distribution—whisking aerates the flour, resulting in a lighter-textured cookie. If you have a fine-mesh sieve, sift the mixture instead to catch any lumps of baking soda that could cause bitter pockets. Set the dry bowl aside near your wet ingredients; having everything mise en place will streamline the next step and prevent overmixing later.
: Combine Wet and Dry Ingredients
Gradually add the dry flour mixture to the wet butter mixture in three additions, folding gently with a silicone spatula after each. Stop mixing the moment you no longer see streaks of flour—overworking the dough develops gluten and makes cookies tough. The dough will be thick and slightly sticky, with a pale golden color. At this point, you’ll notice a few small lumps of butter; that’s totally fine and will create flaky layers as the cookies bake. If you’re using an electric mixer, switch to the lowest speed or stir by hand to avoid overmixing.
: Fold in Chopped Oreos
Pour the coarsely chopped Oreo cookies into the dough and use your spatula to fold them in with a gentle cutting-and-scooping motion. The goal is to distribute the cookie chunks without crushing them into dust—visible pieces are what give these cookies their signature speckled look and crunchy texture. Don’t overthink it; 10-12 folds is usually enough. The dough will be studded with dark chocolate wafers and creamy white filling. If any filling separates, push it back into the dough; those little pockets melt into fudgy swirls during baking.
: Chill the Dough
Cover the bowl with plastic wrap or a reusable lid and refrigerate for at least 1 hour, or up to 3 days. Chilling is non-negotiable: it solidifies the butter, which prevents excessive spreading, and allows the flour to fully hydrate, resulting in a thicker, chewier cookie with concentrated flavor. If you’re short on time, 30 minutes will work, but the texture won’t be quite as premium. For make-ahead convenience, scoop the dough into balls first, then chill them on a parchment-lined plate—this way they’re ready to bake straight from the fridge.
: Preheat and Prepare Baking Sheets
Preheat your oven to 350°F (175°C) with a rack in the center position. Line two large baking sheets with parchment paper or silicone baking mats—this prevents sticking and promotes even browning. If your oven runs hot, reduce to 340°F and watch closely after 9 minutes. While the oven heats, let the chilled dough sit out briefly so it’s scoopable but still firm. Avoid greasing the sheets with cooking spray; the extra fat can cause excessive spreading and burnt edges, a common mistake highlighted in our oatmeal fudge bars recipe tips.
: Scoop, Bake, and Cool
Arrange the dough balls on the prepared baking sheets, spacing them 2 inches apart to allow for spread. Bake one sheet at a time for 11-13 minutes, rotating the pan halfway through, until the edges are set and lightly golden but the centers still look slightly underdone. They’ll continue to cook on the hot pan as they cool. Let the cookies rest on the baking sheet for 5 minutes—this is when the magic happens, as residual heat finishes setting the centers. Then transfer them to a wire rack to cool completely. The result: cookies with crackly tops, melty Oreo pockets, and that signature soft-and-chewy bite. If you’re baking multiple batches, let the sheet cool completely between rounds; a hot pan can start melting the dough too soon.
Nutritional Details
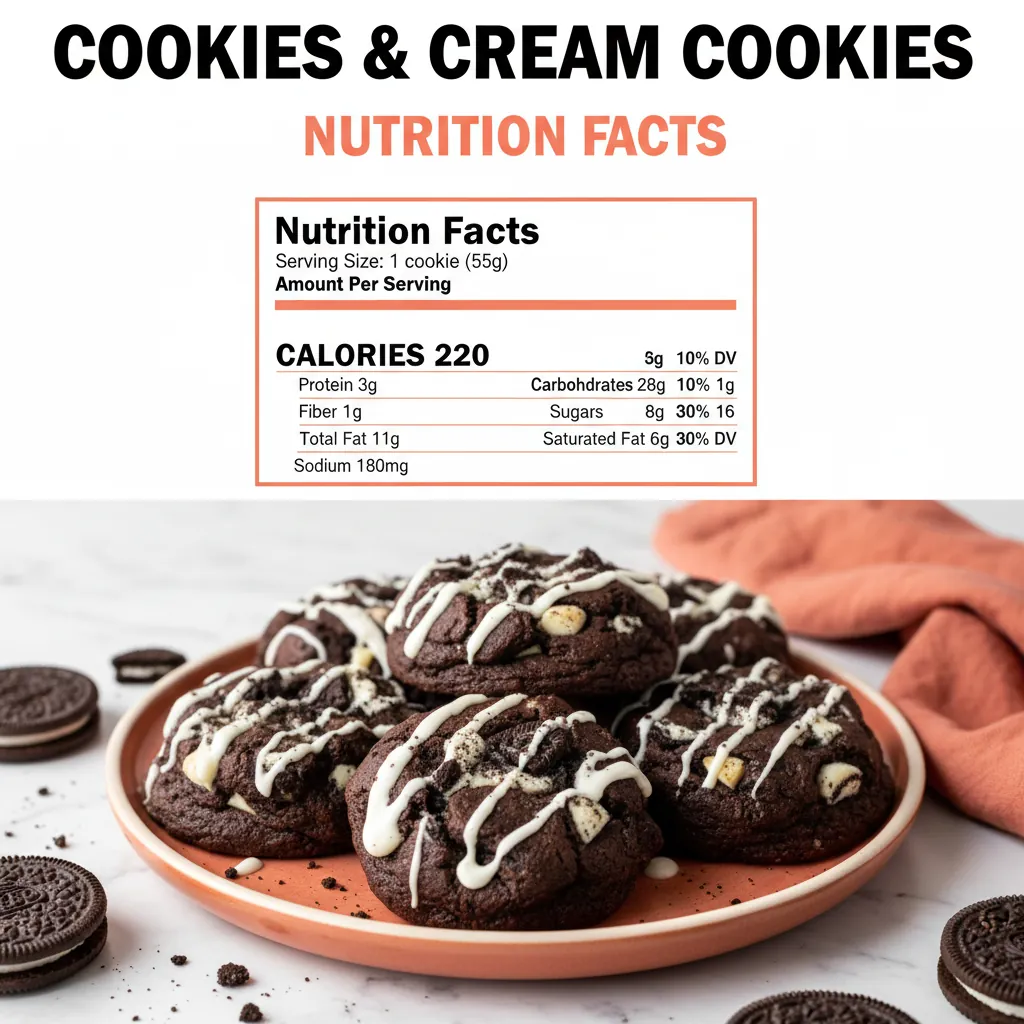
Nutritional values are calculated based on a 24-cookie yield using standard ingredients and verified against USDA FoodData Central for common baking staples. Each cookie contains approximately 12g of sugar and 1g of fiber. For a detailed breakdown of the Oreo cookies recipe used, note that classic Oreos contribute roughly 53 calories per cookie before chopping.
Healthier Options
For a lower-sugar version, reduce both sugars by ¼ cup and add 1 tablespoon of milk to maintain moisture—the dough will still bake up soft thanks to the brown sugar. If you can’t find reduced-sugar sandwich cookies locally, try homemade chocolate wafer cookies from our candy bar recipe, crushed into chunks. Whole wheat pastry flour is another excellent swap; it’s lighter than standard whole wheat and won’t weigh down the cookies. For a vegan version, use plant-based butter sticks (not the tub variety, which has too much water), and look for accidentally vegan chocolate sandwich cookies at natural grocers. The best results come from recipe adaptations that maintain at least 50% of the original fat for texture.
Serving Ideas
These cookies and cream cookies are at their peak about 15 minutes after coming out of the oven—still slightly warm, with the chocolate wafer pieces meltingly soft and the filling swirls gooey. In true American bake-sale fashion, pile them high on a vintage cake stand and watch them vanish. For a nostalgic after-school snack, serve with a tall glass of ice-cold whole milk; the contrast of cold cream against the rich chocolate is unbeatable. If you’re hosting a party, stack them on a platter alongside our churro crack recipe for a dessert table that has something for everyone.
For a more elevated presentation, sandwich a scoop of vanilla bean ice cream between two cookies and roll the edges in extra crushed Oreos for a DIY ice cream sandwich. During the holidays, crumble them over a bowl of vanilla pudding or use them as a crunchy topping for a chocolate cream pie—our chocolate strawberries and cream pie would love the textural contrast. They also make an unexpected addition to a charcuterie dessert board with fresh berries, dark chocolate squares, and a drizzle of salted caramel. Because the cookies aren’t overly sweet, they pair beautifully with a dry sparkling wine or a strong cup of black coffee for a grown-up treat.
Mistakes to Avoid
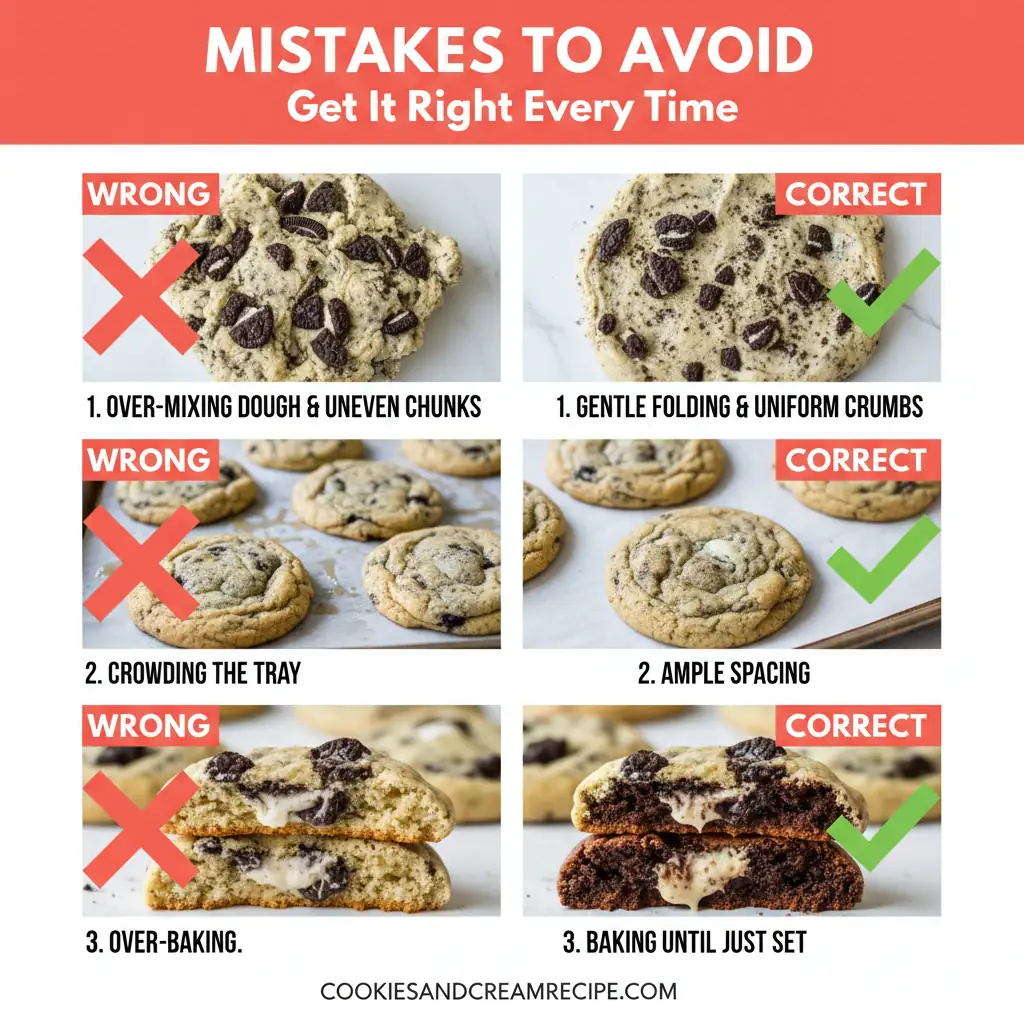
The most common pitfall in any cookie recipe is inaccurate flour measurement. Scooping your measuring cup directly into the flour bag can pack in up to 25% more flour than needed, resulting in dense, dry cookies that barely spread. Instead, spoon the flour into your measuring cup and level it with a knife, or better yet, use a digital kitchen scale. Another frequent error is over-creaming the butter and sugar—stop when the mixture looks homogenous and slightly lightened, not white and whipped. Over-creaming incorporates too much air, causing cookies to puff and then collapse into flat disks. Finally, chopping the Oreos too finely reduces them to a fine dust that disappears into the dough, robbing you of those crave-worthy crunch pockets. Aim for rough, irregular chunks about the size of a hazelnut.
On the baking side, the biggest mistake is skipping the dough chill. Warm dough spreads too fast in the oven, leading to thin, greasy cookies with burned edges. Even a quick 30-minute rest in the fridge makes a noticeable difference in thickness and flavor. Similarly, overcrowding the baking sheet doesn’t allow for proper heat circulation; always leave 2 inches between dough balls. Baking at the wrong temperature is another culprit—an oven thermometer is a small investment that pays off, as most home ovens can be off by 25-50°F. If your cookies are consistently burning on the bottom, double-check that your oven rack is in the center, not the lower third. For more baking science tips, Sally’s Baking Addiction offers excellent troubleshooting guides specific to cookies-and-cream variations.
Finally, don’t overlook the importance of proper cooling. Transferring cookies to a wire rack too early can cause them to break apart, as they’re still setting internally. But leaving them on the hot baking sheet for more than 5 minutes leads to carryover cooking that can overbake the centers. The sweet spot is 5 minutes on the sheet, then carefully move them to a rack. And resist the urge to press down on the dough balls before baking—those domed tops flatten naturally into perfectly crinkled surfaces. If you find your cookies aren’t as gooey as you’d like, reduce the bake time by 1 minute and let the residual heat work its magic.
Storage Tips
Store your cooled cookies and cream cookies in an airtight container at room temperature, layered between sheets of parchment paper to prevent the Oreo chunks from sticking. They’ll stay fresh and chewy for up to 5 days. To revive day-old cookies and restore that just-baked softness, microwave a cookie on a paper towel for 8-10 seconds—the gentle steam softens the cookie without making it soggy. Avoid storing cookies in the refrigerator, as the cold air dries them out and can mute the vanilla flavor; if your kitchen is very humid, add a small piece of bread to the container, which absorbs excess moisture.
For longer storage, freeze the unbaked dough balls on a parchment-lined plate until solid (about 1 hour), then transfer them to a freezer-safe zip-top bag. They can be baked straight from frozen—just add 1-2 minutes to the bake time and expect slightly thicker cookies with extra-chewy centers. Frozen dough keeps for up to 3 months; label the bag with the date and baking temperature so you’re never guessing. You can also freeze fully baked cookies in a single layer, then stack them with parchment in a freezer container; thaw at room temperature for 15 minutes or warm in a 300°F oven for 5 minutes.
For meal prep or holiday planning, this cookies and cream cookies recipe is a dream. Make the dough up to 3 days ahead and keep it covered in the fridge, then bake off fresh batches as needed—the flavor actually improves with a longer chill. Pre-scoop and chill the dough balls for even faster baking later. If you’re assembling cookie boxes, bake a double batch and cool completely before packing, as warm cookies create condensation that leads to sogginess. And don’t forget to check out our cherry pie bars recipe for another freezer-friendly dessert that’s perfect for gifting.
A Few Other Recipes To Try:
Can I use other sandwich cookies instead of Oreos?
Absolutely! While classic Oreos deliver the most recognizable cookies-and-cream flavor, you can swap in any chocolate sandwich cookie, including gluten-free or store-brand versions. Golden Oreos create a vanilla-forward twist, while mint-flavored cookies add a refreshing pop. Just keep the total volume at 2 cups of chopped cookies, and avoid cookies with extra fillings like caramel (which can burn). For a truly homemade touch, try the chocolate wafers from our chocolate lava cake recipe—crush them and mix with a little vanilla frosting to mimic the cream center.
Why did my cookies spread too much and turn out flat?
Excessive spreading is almost always due to one of three issues: butter that was too warm when incorporated, insufficient flour from improper measuring, or skipping the dough chilling step. Your butter should be softened but still cool to the touch (around 65°F)—if you can easily leave a deep indentation with your finger but it doesn’t look greasy, you’re at the right temperature. Always spoon and level your flour, and never skip the 1-hour chill; this solidifies the fat and gives the flour time to absorb moisture, which limits spread.
How can I make these cookies extra thick and bakery-style?
For ultra-thick cookies, increase the chilling time to at least 4 hours or overnight—cold dough spreads less and creates a taller rise. You can also swap ¼ cup of the all-purpose flour for bread flour, which has more gluten-forming protein and adds chew. Scoop the dough into tall cylinders rather than round balls; the height encourages a domed top. Finally, bake at 375°F for 9-10 minutes instead of 350°F for 11-13 minutes—the initial blast of heat sets the exterior quickly while the center stays gooey.
Can I make the dough ahead and freeze it?
Yes, and this cookies and cream cookies recipe is excellent for freezing. After chilling the dough for at least 1 hour, scoop it into individual balls onto a parchment-lined baking sheet and freeze until solid (about 1 hour). Transfer the frozen dough balls to a zip-top freezer bag and store for up to 3 months. Bake directly from frozen at 350°F, adding 1-3 minutes to the bake time. No need to thaw—the cold dough helps the cookies maintain their shape and yields an even chewier texture.
What’s the best way to get the Oreos to stay chunky in the dough?
The key is a gentle hand. Use a sharp knife to coarsely chop the Oreos into irregular, hazelnut-sized pieces rather than crushing them in a food processor or with a rolling pin. Fold them into the dough with a silicone spatula using a cutting-and-scooping motion, and stop as soon as they’re distributed—overmixing fragments the pieces. For the chunkiest results, press a few reserved chopped Oreos onto the top of each dough ball just before baking, which also gives the finished cookies that irresistible loaded look.
There you have it—your new go-to cookies and cream cookies recipe that’s part science, part nostalgia, and entirely irresistible. Whether you’re baking for a weeknight treat, a cookie swap, or just because you’ve gotta have that Oreo fix, these soft, chewy gems deliver. I hope you’ll make them your own—maybe with a sprinkle of sea salt or a scoop of your favorite ice cream. If you give this recipe a try, tag us on Instagram @catcorakitchen and let us know how they turned out. Now preheat that oven and get ready for your kitchen to smell like a bakery.
📚 Read More Delicious Ideas
===RECIPE_CARD_START===
{
“title”: “Cookies and Cream Cookies Recipe (Soft & Chewy!)”,
“description”: “Ultra-soft and chewy cookies loaded with generous chunks of Oreo cookies throughout. These bakery-style treats feature a vanilla-flecked dough with crackly edges, fudgy centers, and the perfect balance of chocolate-and-cream flavor in every bite.”,
“image_url”: “”,
“course”: “Dessert”,
“cuisine”: “American”,
“category”: “Cookies & Bars”,
“difficulty”: “Easy”,
“tags”: “cookies and cream cookies recipe, Oreo cookies recipe, chocolate cookies with cream, easy cookies and cream cookies, soft Oreo cookie recipe, best cookies and cream dessert, easy recipe, homemade”,
“author”: “”,
“ingredients”: “2½ cups (313g) all-purpose flour, spooned and leveledn1 teaspoon baking sodan½ teaspoon fine sea saltn1 cup (226g) unsalted butter, softened to cool room temperaturen¾ cup (150g) packed light brown sugarn½ cup (100g) granulated sugarn2 large eggs, at room temperaturen2 teaspoons pure vanilla extractn2 cups coarsely chopped Oreo cookies (about 20-22 cookies)”,
“equipment

Cookies and Cream Cookies
Ingredients
Equipment
Method

- In a mixing bowl, whisk together flour, baking soda, and sea salt.
- In a separate bowl, cream the butter, brown sugar, and granulated sugar until pale and fluffy.
- Add eggs and vanilla extract to the creamed mixture and mix until combined.
- Gradually fold in the dry ingredients until just combined, being careful not to overmix.
- Gently fold in the chopped Oreo cookies.
- Chill the dough for at least 30 minutes.
- Preheat the oven and line baking sheets with parchment paper.
- Scoop tablespoon-sized portions of dough onto the baking sheets about 2 inches apart.
- Bake until the edges are golden, then allow them to cool on the baking sheets before transferring to a wire rack.